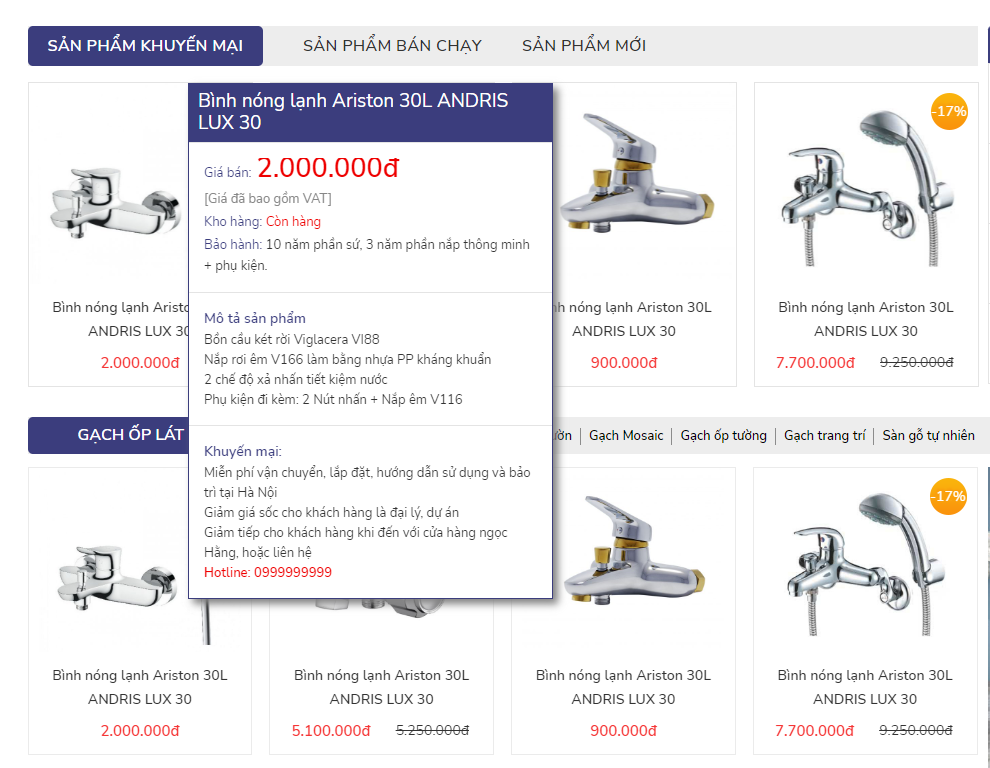
Hover hiển thị thông tin sản phẩm dạng Tooltip cho Woocommerce
03/03/2023 - 237
Làm thế nào để khách hàng xem website của các bạn trên trang cửa hàng có thể Hover hiển thị thông tin sản phẩm cụ thể hơn. Trong bài viết này chúng tôi sẽ hướng dẫn cụ thể để hiển thị thông tin ra khi khách hàng di chuột Hover Tooltip đẹp mắt

Chúng tôi vẫn sử dụng hook được cung cấp bởi Woocommerce, hook này được viết vào file function.php của themes.
// Hiên thị thông tin sản phẩm từ woocommerce - Flatsome
add_action('woocommerce_after_shop_loop_item', 'display_front_ends');
function display_front_ends() {
    // Show on
    ?>
    <a class="wph_tooltip_box" href="<?php echo the_permalink(); ?>">
        <div class="wph_tooltip tooltip" >
            <strong class="wph_tooltip_title"><?php the_title();?></strong>
            <?php echo get_the_excerpt(); ?>
        </div>
    </a>
    <?php
}
Đầu tiên chúng có hook như sau.
Chúng tôi sử dụng woocommerce_after_shop_loop_item để đưa thông tin mổ tả sản phẩm ra trang của hàng và trang lưu trữ sản phẩm.
Code đầy đủ của chúng tôi như sau, và chúng tôi sẽ nói rõ hơn về code ở phía dưới.
Hàm the_title để lấy tên sản phẩm và get_the_excerpt để lấy mô tả ngắn sản phẩm ra ngoài.
Bây giờ hãy tiến hàng viết css và js để ẩn nó đi. Chỉ hiển thị khi khách hàng di chuột hover.
sau đó bạn thêm đoạn css như bên dưới
.wph_tooltip_box {
    overflow: hidden;
    margin-bottom: 10px;
    position: absolute;
    top: 0;
    left: 0;
    height: 80%;
    width: 100%;
}
.wph_tooltip_box ul {
    list-style:none;
    padding:0px;
    margin: 5px 0;
    border-top: 1px solid #e5e5e5;
}

.wph_tooltip_box strong{
    display: block;
}

.wph_tooltip * {
    height:initial !important;
}
.wph_tooltip {
    display:none;
    position: fixed;
    z-index: 99;
    top: 0;
    left: 0;
    font-size: 11px;
    width: 250px;
    height: auto;
    padding: 5px;
    border-radius: 3px;
    box-shadow: 0 1px 2px #666;
    background: #fff;
    color: #000 !important;
}

.wph_tooltip_box ul li{
    margin:2px;
}

.wph_tooltip .wph_tooltip_title {
    background-color:red;
    color: #fff;
    margin: -5px;
    margin-bottom: 3px;
    white-space: nowrap;
    text-overflow: ellipsis;
    overflow: hidden;
    padding: 5px;
}
.wph_tooltip img{
    display:none!important;
}

/*hide on small screen / mobile*/
@media (max-width: 600px) {
    .wph_tooltip{
        display:none!important;
    }
}
Cuối cùng thêm Java để hiện thị nhé
jQuery(document).ready(function($) {

    var $parent,
        windowWidth,
        windowHeight;

    //get actual window size
    function winSize() {
        windowWidth = $(window).width(),
            windowHeight = $(window).height();
    }
    winSize();
    $(window).resize(winSize);
    //tooltip fadeIn and fadeOut on hover
    $('.tooltip').each(function() {

        $(this).parent().hover(function() {
          $(this).find('.tooltip').fadeIn('fast');
        }, function() {
           $(this).find('.tooltip').fadeOut('fast');
        });

    });


    //tooltip position
    $(document).mousemove(function(e) {
        var mouseY = e.clientY,
            mouseX = e.clientX,
            tooltipHeight,
            tooltipWidth;

        $('.tooltip').each(function() {
            var $tooltip = $(this);
            tooltipHeight = $tooltip.outerHeight();
            tooltipWidth = $tooltip.width();
            $parent = $tooltip.parent();

            $tooltip.css({
                'left':mouseX+0,
                'top':mouseY+20
            });

            //reposition
            if (tooltipWidth + mouseX+ 20> windowWidth) {
                $tooltip.css({
                    'left':mouseX-tooltipWidth-20
                });
            }

            if (tooltipHeight + mouseY +20 > windowHeight) {
                $tooltip.css({
                    'top':mouseY-20-tooltipHeight
                });
            }
        });
    });
});//end ready
Hãy đặt chúng vào hai file css và js riêng biệt và chúng cần được móc vào để hoạt động. Chúng tôi sử dụng hook như sau cho child themes.
// Enqueue required fonts, scripts, and styles.
add_action( 'wp_enqueue_scripts', 'favorite_enqueue_scripts' );
function favorite_enqueue_scripts() {

    wp_enqueue_script( 'wph_mainjs', get_stylesheet_directory_uri() . '/assets/js/main.js' , 'jquery' , '' , true );
    wp_enqueue_style( 'wph_maincss', get_stylesheet_directory_uri() . '/assets/css/main.css' );
}
Chúc các bạn thành công!


